Dual-booting Linux alongside Windows lets you choose either operating system at startup, giving you the best of both worlds on one PC. This quick guide will show you how to set up a dual-boot of Windows and a Linux distro (focused on Ubuntu/Debian-based systems) in a UEFI environment.
We’ll cover backing up, creating a bootable USB, prepping your Windows partition, installing Linux, and getting your dual-boot working, all in about 5 minutes of reading. I’m writing this guide while I add Ubuntu to my already dual-boot system, so I will inline that as well for those looking to do the same.

Note: If your PC uses older Legacy BIOS/MBR, the overall process is similar, but see the end of this article for differences.
In This Article
Before You Begin: Backup, Precautions, and Prep
Before making any changes to your system, back up your important data. You will be resizing partitions and installing another OS, so a mistake could wipe out data if you’re not careful. Copy your must-have files (documents, pictures, etc.) to an external drive or cloud storage before proceeding.
If you back up your /home/user/ directory in the cloud or NAS, then you should have most of what you need. It’s rare to lose data if you follow these steps correctly, but it’s always better to be safe!
Also see backup discussions in our Linux community forum:
A few other precautions and checks to do upfront:
- Confirm UEFI: This guide assumes a UEFI-based system (common on most PCs in the last decade). If your Windows was installed with UEFI (using GPT partitioning), you’re all set. (To verify, you can check System Information in Windows for “BIOS Mode: UEFI”). If instead you have Legacy BIOS with an MBR disk, see the note at the end. The dual-boot steps will differ slightly.
- Set firmware to UEFI-only: If your motherboard supports both UEFI and Legacy (CSM), it’s best to turn off Legacy mode in the BIOS before you start the Linux installer. This ensures the system boots in UEFI mode only, which avoids situations where Debian or Ubuntu might fall back to Legacy boot. Mixing the two can create unnecessary complications. On modern hardware, sticking with UEFI-only gives a cleaner setup, better compatibility, and fewer headaches down the road.
- BitLocker Encryption: If your Windows drive uses BitLocker encryption (common on Windows 10/11 Pro or enterprise setups), disable or suspend BitLocker before installing Linux. This ensures the Linux installer can access the disk to partition it. You can re-enable BitLocker after installation if needed.
- Windows Fast Startup: It’s recommended to disable Fast Startup in Windows to avoid issues. Fast Startup can keep the Windows disk in a semi-hibernated state, which might prevent Linux from properly detecting the Windows partition or mounting shared drives. You can turn it off in Windows Power Options (uncheck “Turn on fast startup”). You most times can also disable Fast Start in your system’s BIOS settings.
- Install Windows first: If you haven’t installed anything yet, install Windows before Linux. Windows installers don’t gracefully detect Linux, whereas Linux installers will detect Windows and set up a bootloader for both. The general best practice is Windows first, Linux second for dual-boot setups.
New to GRUB or EFI?
If this is your first time hearing terms like GRUB or EFI partition, these are just parts of how modern systems boot. GRUB is the bootloader that lets you choose between Linux and Windows at startup. The EFI partition (used on newer UEFI-based systems) holds the boot files that let your system launch both OSes cleanly.
If you want a deeper breakdown of how these pieces work together in a dual-boot setup, I highly recommend reading this beginner-friendly guide from Zenarmor explains the concepts in more detail.
Windows Prep: Disk Partitioning (optional)
")
The main thing you need before installing Linux is to have free disk space where Linux will live. If your Windows PC has only a single C: drive taking up the whole disk, you can just skip this step and let the Linux installer shrink it by installing Linux alongside Windows. The installer will take care of the spacing and allow you to set how much space you would like to use.
In my case, I already have Windows 11 installed on a 2 TB NVMe and Kali Linux installed on a 1 TB 500 GB NVMe. So it’s really a triple-boot setup (multi-boot). My aim is to switch to Ubuntu 24.04 LTS w/ Ubuntu Pro’s ESM as my daily, but without removing Kali because I still need to use it at times. More details about that at the end of this guide!
That said, this guide is really for dual-boot, and so I will include related screenshots for shrinking the Windows partition below.

Before running the Linux installer, here’s how (again, optional):
- Open Disk Management: In Windows, press Win+R, type
diskmgmt.msc. This opens the Disk Management utility (above screenshot). - Shrink Volume: Locate your main Windows partition (C: drive). Right-click on it and choose Shrink Volume. Enter the amount of space to free up for Linux, e.g., 20, 40, or more GB. Shrink the partition, and you should see new “Unallocated” space on the disk. (If you have multiple drives or partitions, you could delete or shrink a different partition to create space. Just never delete the C: (or Windows) partition!)

- Create Linux Partition: You may leave the space unallocated because it can be formatted manually with the Linux installer. Alternatively, you can create a new partition in that space and call it the default New Volume in exFAT format. As mentioned, unless you know what you are doing or have issues with the Linux installer, it is recommended to skip this step, which is what I did.

After this, you should have a chunk of free disk space ready for Linux. Remember the number (size) or roughly the position of this free space because you’ll need to identify it during Linux installation.
In my case, my 2 TB Hynix NVMe is to be used exclusively for gaming; it’s already ~ 50% full, I don’t want to install on the Windows 11 drive. As such, I will install Ubuntu 24.04 LTS on my Kali Linux partition and give it about 30% of the disk space.
Step 1: Create a Bootable Linux USB

Next, prepare a bootable USB drive with your Linux distribution:
- Download the Linux ISO: Download the ISO image of the Linux distro you want to install (e.g., Ubuntu from the official website). For Ubuntu, it’s about a 6 GB download.
- Use a USB writing tool: Grab a tool like Rufus (on Windows) or Etcher (cross-platform; I prefer Etcher) to create the bootable USB. Insert an empty USB stick (16 GB or larger). In Etcher, select the USB, choose the Linux ISO, and click Flash! This starts the process, and write the ISO to your USB. (This will erase the USB drive, so make sure nothing important is on it.)
- Enable USB boot: Most modern computers will boot from a USB if it’s inserted. However, some systems might require adjusting BIOS/UEFI settings to allow booting from USB or temporarily disabling Secure Boot. In general, Ubuntu and a few major Linux distros support UEFI Secure Boot just fine nowadays, so if you are using one of those, you don’t need to disable Secure Boot. Only if you find that the PC refuses to boot the USB, you can consider turning off Secure Boot.
Once the USB is ready, you’re set to install Linux!
As mentioned above, most modern Linux installers, like Ubuntu, Debian, and Fedora (useful but in French), will detect Windows and offer to shrink it for you. So again, in most cases, there’s no need to shrink partitions ahead of time. I’ve only included it in case you have trouble, which is quite common with so many distros and installers!
Step 2: Install Linux Alongside Windows

Boot from the USB drive you created. As your system starts, press the key for the boot menu or UEFI setup (usually F12, F10, or Del, depending on your motherboard). Choose the USB device. Ideally the one labeled as UEFI launches the Linux live environment. You’ll typically see options like “Try Ubuntu” or “Install Ubuntu.” Go ahead and start the installer.
The installer will ask a few setup basics: language, keyboard layout, and whether to install updates or third-party drivers. You can choose to install those now or later; it doesn’t affect the dual-boot setup.

When you reach the disk setup screen, this is where the dual-boot (or multi-boot) action happens:
- If you see “Install Ubuntu alongside Windows Boot Manager”, select it. The installer will automatically resize the Windows partition to make room for Linux. You’ll typically get a slider to control how much space to allocate to each OS. Adjust as needed and proceed. This is the easiest route, and most modern distros handle it very well.
- If you don’t see that option, choose “Something else” to manually set up partitions. Look for free or unallocated space on the disk and create a new partition mounted at
/(the root filesystem). Format it as ext4, and use the full available space unless you plan to create separate/homeor swap partitions (not necessary unless you know you need it).
For me today, I’m going to select “Install Ubuntu alongside Kali GNU/Linux Rolling and Windows Boot Manager,” and then I will select the Kali partition so that the installer shrinks it and uses the leftover space to install Ubuntu:

Important: In UEFI mode, your system already has an EFI System Partition (ESP). Typically a small ~ 500MB to ~1000MB FAT32 partition. The Linux installer should detect it. Otherwise, select it, set the mount point as /boot/efi, and do not format it. This ensures the GRUB bootloader is installed alongside the OS boot files, preserving existing OS boot options. Proceed through the remaining prompts (user account, timezone, password), then click Install.

The process takes around 2–3 minutes if you have fast NVMe storage. When it finishes, remove the USB stick and reboot.
Step 3: Reboot and Choose Your OS

Moment of truth: After rebooting, your computer should load the GRUB bootloader menu with a list of operating systems. You’ll see an entry for the Linux distribution you installed and one for Windows. Use the arrow keys to select which OS to boot.
If everything went smoothly, you can now boot into either Linux or Windows on each startup. Congrats!
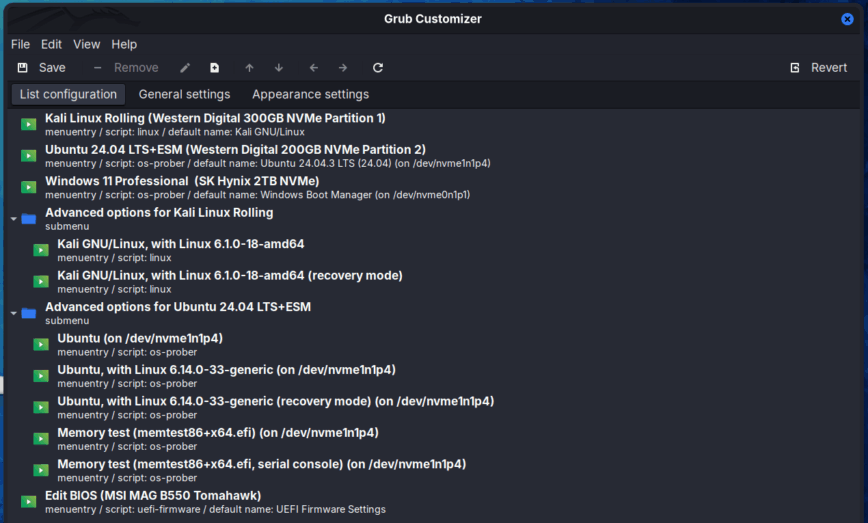
Note, I customized my boot entries using Grub Customizer:
If you don’t see a GRUB menu: It’s possible your PC booted straight into Windows. This usually means the UEFI firmware is still set to boot Windows first. To fix this, enter your BIOS/UEFI setup and adjust the boot order: move the entry for Ubuntu/Linux up to the top above Windows Boot Manager. Save and reboot, and you should get the GRUB menu. (On some systems, you can also use the one-time boot menu (F12 etc.) each time to choose Ubuntu, but changing the order is more convenient.)
If Windows isn’t listed in GRUB: This is uncommon if Windows was installed first and not hibernated. But if it happens, boot into your new Linux and open a terminal, run sudo update-grub, then reboot. This command forces Linux to re-detect OSes; it should find Windows and add it to the menu. Also ensure that Windows wasn’t left in hibernation (another reason I recommended to disable Fast Startup earlier).
Also, try sudo update-grub command to rediscover and also sudo efibootmgrto list current boot order:
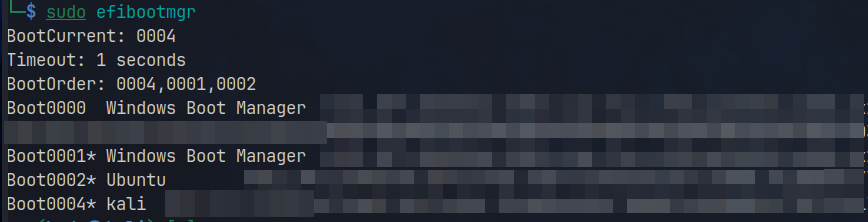
So for example, once I finish setting up Ubuntu, I can change my system’s boot order to boot Ubuntu first with:
![]()
Or you can make the change with Grub Customizer, or better yet, manually edit the config files, which I used to do before Grub Customizer.
More Troubleshooting
In most cases, the steps above should work smoothly. But occasionally, dual-booting throws a curveball. Especially on modern UEFI systems. You might run into issues like:
- GRUB not showing up after install
- “No bootable device” on restart
- Booting straight into Windows
- Landing at a
grub rescue>prompt
These are usually fixable. One handy tool is Boot-Repair, a bootable utility that can detect and correct bootloader issues automatically. It’s particularly useful if GRUB didn’t install properly or if Secure Boot interfered with the process.
Still stuck? Feel free to post in our Linux Community Forums: it’s our space for questions, walkthroughs, and helping each other out. Just describe what you’re seeing, and someone (maybe me) will try to point you in the right direction.
Other Distros and BIOS Differences
This guide focused on Ubuntu/Debian-based installers, but you can also dual-boot Fedora, Arch, openSUSE, etc. with Windows in much the same way. The key steps: backing up, creating a USB, and installing, all apply. The main differences are in the installer interface and partitioning tools:
Fedora/Red Hat family: Uses the Anaconda installer. You’ll still choose “Install alongside” or manually allocate the free space (shrink Windows as we did). Fedora will install the GRUB bootloader and usually add a “Windows Boot Manager” entry automatically. Secure Boot is supported out-of-the-box for Fedora as well. One note: Fedora’s partitioner might present slightly different terminology (e.g., “Shrink current system” or “Reclaim space”), but the process is equivalent.
Arch Linux (and Arch-based): Arch has no graphical installer by default (but see ArchInstall). Dual-booting Arch requires manual partitioning and command-line installation. You would boot an Arch ISO and follow the Arch Wiki steps to partition the disk, install the base system, and set up GRUB (including running os-prober to detect Windows). It’s more advanced, so if you’re new, consider using an easier installer (or an Arch-based distro like EndeavourOS or Manjaro, which provide user-friendly installers).
Other distros (openSUSE, etc.): Each may have their own installer, but generally offer similar “alongside” installation options. Always look for an option that does not erase the whole disk. If unsure, use manual partitioning to select the free space like we described. The result is the same: two OSes and a bootloader menu.
Legacy BIOS Systems: If your machine uses Legacy BIOS (non UEFI), the dual-boot process involves MBR partitioning and has a few differences. You won’t be dealing with an EFI partition, instead, the Linux bootloader (GRUB) will be written directly into the MBR of the disk. This replaces the Windows bootloader, but GRUB is perfectly capable of chain-loading Windows, so both operating systems remain accessible. If you ever decide to remove Linux, however, you’ll need to restore the original Windows MBR manually.
One common hurdle on MBR systems is that the installer might not offer an “Install alongside” option if the disk already has four primary partitions, which is the maximum allowed by the MBR scheme. In that case, you may need to delete a non-essential partition or convert one into an extended partition to proceed.
When it comes to booting, BIOS based setups usually present a basic text-mode GRUB menu showing both Windows and Linux entries. If you don’t see the menu after installation, try pressing a key like Esc or Shift immediately after the BIOS POST screen. Some GRUB configurations hide the menu unless multiple OSes are detected or unless you manually interrupt the boot process.
My Ubuntu 24.04 LTS + ESM setup
After successfully setting up my multi-boot system (or dual-boot, for most users), I immediately took advantage of the opportunity that Ubuntu offers through Ubuntu Pro. Upon booting into the new installation, the system prompted me with an option to enable Ubuntu Pro, which provides access to ESM (Expanded Security Maintenance). I chose “Enable Ubuntu Pro,” logged into my Ubuntu One account, and added my desktop to my Ubuntu Pro subscription. Now, this machine is covered for security and maintenance updates until 2034!
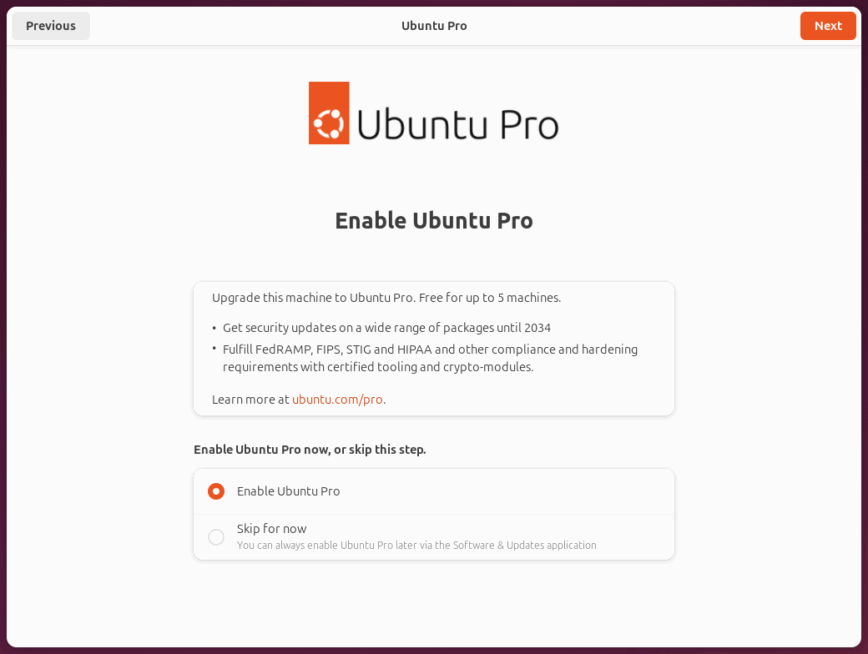
The process was straightforward. In the first step, Ubuntu presented an explanation of what Pro offers and allowed me to either enable it immediately or skip. I selected “Enable Ubuntu Pro.”
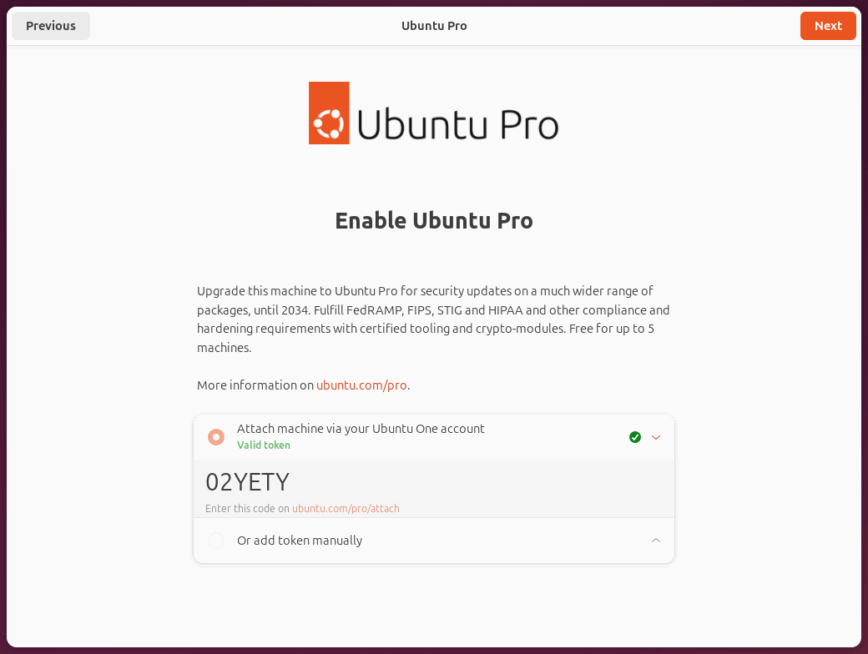
In the next step , I authenticated with my Ubuntu One account and attached the machine using the generated token.
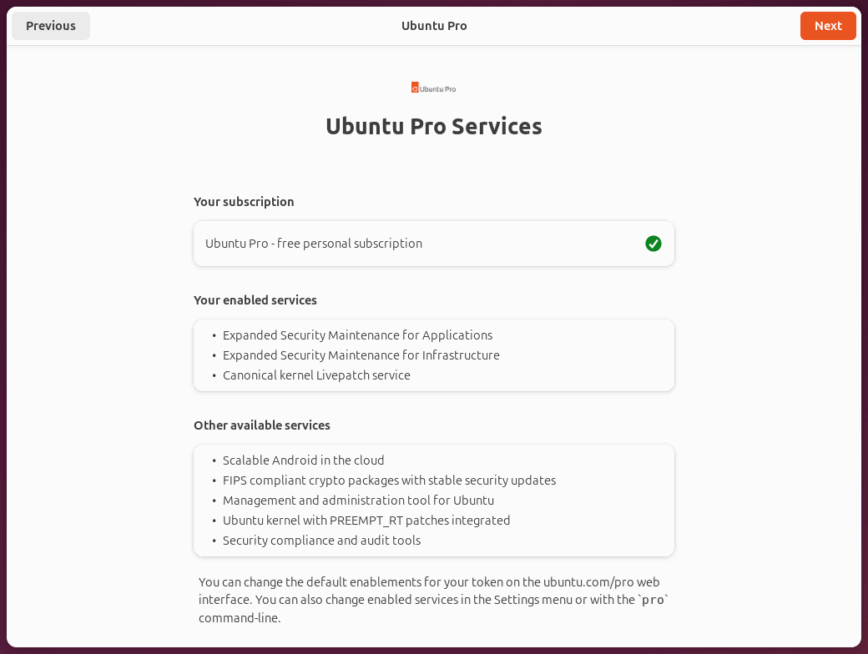
Finally, as you can see it’s confirmed that the subscription was active, with ESM for Applications and Infrastructure as well as Livepatch is now enabled.
What draws me most to this setup is the long-term stability that comes with using an LTS (Long-Term Support) release. Ubuntu 24.04 LTS paired with ESM offers the best of both worlds. It’s rock-solid, doesn’t require in-place upgrades for nearly a decade, and will only become more stable over time.
I also like the security benefits. With ESM, I’ll receive critical security updates well beyond the standard support window, reducing the need for disruptive upgrades. And since Ubuntu is still based on the Debian family, I can continue using apt.
Two distros, using one set of shared folders
With my multi-boot setup, I can run both Kali Linux and Ubuntu on the same PC while keeping all my personal files in sync. Instead of duplicating data and having two divergent sets of working files, I’ve configured a few shared directories using symlinks (detailed here). This lets me access and save files in the same folders from either distribution, so whether I’m working in Ubuntu or Kali, my Documents, Downloads, and other key directories are always in sync.
Conclusion
Overall, dual-booting on BIOS is less common on newer hardware, but it is certainly possible. The core idea of partitioning and installing both OSes still applies.
You should now have a working dual-boot setup. Whenever you start your computer, simply pick Windows or Linux from the boot menu and enjoy! Dual-boot and multi-boot allow you the flexibility to use Windows for certain tasks and Linux (even multiple Linux distros) for others without requiring a second machine. Just remember to keep both systems updated and to always have those backups handy. Happy dual-booting!