Jun 04, 2024
Valentinas C.
Python is known for its easy learning curve, natural syntax, and great versatility. This makes it a popular choice for large-scale automation projects that evolve over time. A key secret to unlocking that versatility is creating Python virtual environments.
A virtual environment offers a self-contained space isolated from other projects where you can run specific versions of the Python interpreter, code, and libraries. This functionality is built-in. But how do you activate, create, and run them?
In this post, we will take a closer look at these virtual Python environments and provide a step-by-step guide for creating them.
What Is a Virtual Environment in Python?
A virtual environment, or virtualenv, is a fully self-contained development environment, complete with its own Python interpreter, libraries, and required dependencies. This creates a separate “mini” Python setup that’s completely isolated from the system-wide Python installation and any other virtual environments you may have.
Virtual environments are especially useful when you need to work on multiple projects or multiple versions of the same project without causing conflicts or delays.
For example, suppose you need to debug a critical production bug, but it uses an old Python version and specific libraries. You can set up a new virtual environment to recreate that exact setup without affecting your main Python installation or other projects.
This setup offers several benefits:
- Save time. There is no need to uninstall and reinstall different versions of Python on your system to test specific scenarios or new tools.
- No conflicts. As each virtual environment is self-contained, you avoid any conflicts that may arise between project-specific libraries and system-wide installations.
- Clean development setup. A problem in one environment won’t affect other projects.
- Version versatility. You can work with multiple Python versions and libraries simultaneously.
- Easier debugging. It is easier to reproduce and fix bugs, as you’ll be able to build exact replicas of the production environments on your test machine.

How to Create a Python Virtual Environment
Now that we know what a virtual environment is, let’s explore how to create one. Do note that there are multiple ways to create a virtualenv, such as:
In this tutorial, we will be using venv, as it’s simple and offers granular control over the virtual environment configuration.
For the operating system, we will be using a Ubuntu server. Hence, the commands shared in this tutorial will work for Ubuntu only and may need to be adapted for other Linux distributions or operating systems.
Step 1 – Get a VPS for Your Virtual Environment
First, you’ll need a Virtual Private Server (VPS) to run your virtual environment. Make sure you choose a reliable, secure, and scalable VPS hosting service so that it’s easy to create and manage multiple virtual environments in the long run.
At Hostinger, we offer a VPS hosting service with a flexible pricing model, an extensive feature set, free automated backups, and a 30-day money-back guarantee.
Step 2 – Set up Your Virtual Private Server
Log in to your VPS and configure it as needed. For example, you can update the VPS, create users for yourself and your colleagues, configure a firewall and other security controls, as well as check out the required source code repositories.
Step 3 – Connect to your VPS
After you have set up your VPS, you are ready to SSH into it. SSH (Secure Shell) is a secure communication protocol for remotely accessing and managing servers. You can use PuTTY, a SSH client, to SSH into your VPS.
Step 4 – Install Python
Then, install Python on your VPS by running the following command:
sudo apt install python3
Let’s also install pip, as it will be used to fetch the required packages:
sudo apt install python3-pip
Step 5 – Create Your First Virtual Environment
To create your first new virtual environment for Python, you will need the venv module. If you are using Python 3.3 or above, the venv module is included in the standard library, so there’s no need to install it separately.
Start by checking your Python version by running this command:
python3 --version
If you are on a version lower than 3.3, you can install the module by running this command:
sudo apt install python3-venv
Remember, if you are on 3.3 or higher, you don’t have to run the above command. Either way, you should now be ready to initialize the virtual environment.
Create a new virtual environment directory and navigate inside it as follows:
mkdir myprojectcd myproject
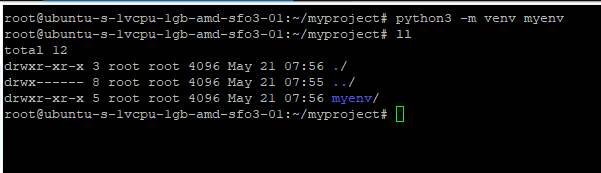
Now, run the following command to create the virtual environment:
python3 -m venv myenv
Replace myenv with your preferred environment name.
After a few moments, you should see a new directory created with the name of your virtual environment.
Step 6 – Activate the Virtual Environment
To activate a virtual environment, input this command:
source myenv/bin/activate
If you chose a different name for your virtualenv, make sure to use that instead of myenv in the above command.
After running the command, your command prompt will change to show the name of the virtual environment, like this:

This means that the virtual environment has successfully been activated.
Deactivating and Removing Virtual Environments
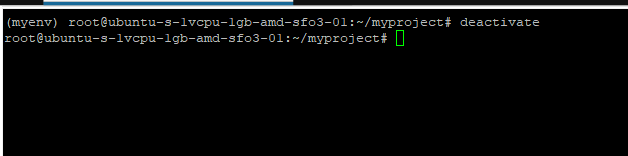
If you need to deactivate a virtual environment, simply execute the following command:
deactivate
You should see that the command prompt now reverts to the way it was originally.
We recommend removing virtual environments once they are no longer needed to free up disk space and avoid clutter on your system. To remove a virtual environment, simply navigate to its parent directory and issue the following command:
rm -rf myenv
However, be cautious, as the above command will permanently delete the directory and its contents without confirmation.
Managing Multiple Environments
The best part about creating virtual environments is the freedom to have as many as you need on your system. This means that you can have one environment for a web development project using Django, another for a data analysis project using pandas, and yet another for a machine learning project using TensorFlow.
You can create a new virtual environment using the same venv command, but in a different directory. For example:
python3 -m venv myenv2
You can activate this new virtual environment the same way we did earlier:
source myenv2/bin/activate
To switch between virtual environments, simply deactivate the current one and activate the other one. The commands to perform both actions will remain the same.
Installing Libraries in a Virtual Environment
After you have created and activated a venv in Python, you are ready to install libraries inside it to achieve the desired configuration. pip should also be pre-installed inside the environment, and we will now install the needed libraries.
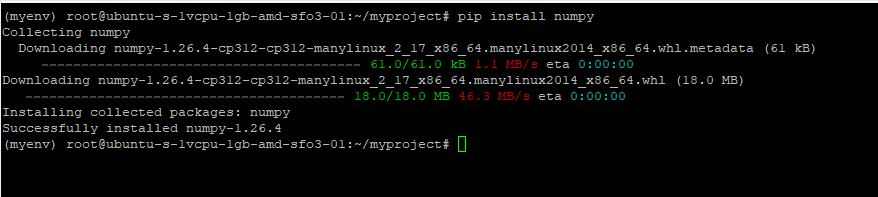
For example, you can install the numpy library by running this command:
pip install numpy
Expect an output similar to this:
It’s also possible to install a particular version of a library. For example, the following command installs the 2.25.1 version of the requests library, along with all its dependencies:
pip install requests==2.25.1
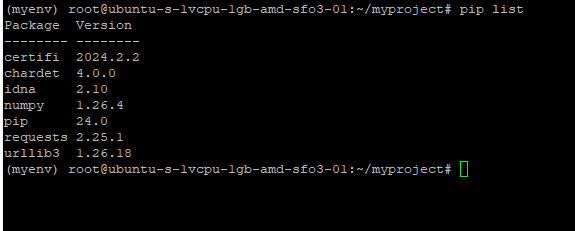
To see the list of installed packages, use this command:
pip list
Expect to see numpy, requests, and their dependencies in the output:
Installing Libraries via a Requirements File
If your project uses several libraries, you can also create a requirements file that specifies the list of libraries along with their needed versions. Here’s how a sample requirements.txt file would look:
# General librariesrequests>=2.25.1
beautifulsoup4>=4.9.3
matplotlib>=3.4.2
# Development librariespytest>=6.2.4
flake8>=3.9.2
To install all the libraries listed in this requirements file, run this command:
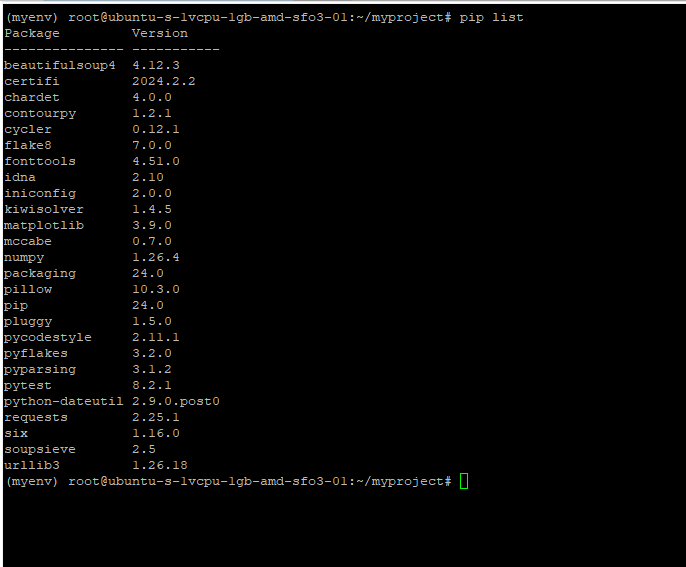
pip install -r requirements.txt
The command will iteratively install all listed Python packages and their dependencies.
You can do a pip list again to ensure that everything has been installed correctly:
Exploring Other Virtual Environment Features
In the following sections, we will discuss some additional virtualenv features that are useful for Python developers.
Exporting Environment Configuration
The venv module allows you to export the configuration of a virtual environment to a requirements file. This can be handy if you want to share your environment setup with collaborators or recreate it on another machine.
To do so, activate your virtual environment and run the following command:
pip freeze > requirements.txt
It will create a requirements file that specifies all the installed packages and their versions.
Checking Environment Integrity
If at any time you want to ensure that all the dependencies in the environment are up-to-date and consistent, run this command:
pip check
It will report any inconsistencies or problems. If there are none, it should output:
No broken requirements found
Updating Dependencies
To update all the packages in your virtual environment to their latest versions, run this command:
pip install --upgrade -r requirements.txt
Conclusion
Python virtual environments are a foolproof way to test Python code in self-sufficient sandboxes. Whether you have to reproduce a production bug, manage different versions of Python code on the same machine, or experiment with different libraries without affecting your main Python installation, virtual environments are the way to go.
You should now feel confident to create, set up, and manage a virtual environment within Python. It’s time to try out your first Python virtual environment for yourself.
How to Create a Virtual Environment in Python FAQ
Here are some answers to common questions we see about Python virtual environments to help you.
Why Would I Need to Create a Virtual Environment for My Python Projects?
A virtual environment allows you to create a sandboxed environment for testing Python applications. Each environment can have its own version of Python interpreter, source code, and libraries. This way, you can test for errors or trial different configurations and scenarios without affecting any Python installations on your main system.
Can I Create Multiple Virtual Environments for Different Python Projects?
You can create multiple virtual environments for your Python projects on the same machine. To switch between two virtual environments, simply deactivate the current one and activate the other.
Can I Install Packages and Dependencies Within a Virtual Environment?
You can install packages and dependencies in a virtual environment using the pip command. These packages and dependencies won’t conflict with or replace any packages installed on the main system.

Valentinas Čirba is a VPS Product Manager. His physics degree and 10+ years of experience in the software industry make him an expert in virtualization and cloud technologies. He is passionate about making complex things simple for end users. When he’s not working, Valentinas likes to spend time with his family and friends. He also enjoys playing chess and doing crossword puzzles.