Loaded: loaded (/etc/systemd/system/valheimserver.service; enabled; vendor preset: enabled)
Active: active (running) since Thu 2021-03-04 12:34:56 UTC; 1min 17s ago
Main PID: 12345 (valheim_server)
Status: “Game server connected”
Tasks: 23 (limit: 4915)
Memory: 300M
CGroup: /system.slice/valheimserver.service
└─12345 /home/valheim/valheimserver/valheim_server.x86_64 -nographics -batchmode -port 2456 -public 1 -name “YourServerName” -world “YourWorldName” -password “YourPassword”
6. Connect to the Server
Valheim server’s requirements are relatively modest compared to other games on dedicated servers, such as Satisfactory or Enshrouded. Here’s what you’ll need:
Hostinger’s Game Panel allows you to install multiple dedicated servers within a single account. For optimal performance when running several servers, consider upgrading your plan.
…
Active: inactive (dead) since Thu 2021-03-04 12:34:56 UTC; 1min 17s ago
…
In this article, you’ll learn how to set up a Valheim dedicated server on a Linux virtual private server (VPS). Ready to rule your own Valheim server and embark on an epic saga with your friends? If so, let’s dive in!
- Operating system. Major Linux distributions, Windows 7 or newer, Windows Server 2016 or 2019.
- CPU. At least a quad-core processor.
- RAM. A minimum of 2 GB, though 4 GB is recommended if you plan on hosting more players.
- Storage. At least 2 GB to get started, but consider 4 GB or more for expanded game data storage.
With Hostinger, you’re getting more than just VPS for gaming; you’re investing in a robust gaming server supported by solid hardware and a dependable network for minimal downtime.
sudo nano /etc/systemd/system/valheimserver.service
- Insert the following configuration, adjusting paths and parameters as necessary:
Yes, you can customize Valheim dedicated server settings, including server name, new world generation, and player limits, through startup commands or configuration files for a tailored gameplay experience.
If your server receives an update from Valve, follow these steps to apply it:
./steamcmd +force_install_dir /home/valheim/valheimserver +login anonymous +app_update 896660 +quit
- Navigate to the Valheim server folder:
sudo -u valheim -s
- Move to the new user’s home directory:
cd ~/.config/unity3d/IronGate/Valheim/worlds
mkdir -p ~/ValheimBackups/worlds
cp ~/.config/unity3d/IronGate/Valheim/worlds/*.{db,fwl} ~/ValheimBackups/worlds
./steamcmd +login anonymous +force_install_dir /home/valheim/valheimserver +app_update 896660 validate +quit
- Restart the server once the update is finished:
Ariffud M.

Pro Tip
For players who prefer more control and a hands-on approach, you can manually install the Valheim dedicated server. In this tutorial, we’ll use Debian 11 as our operating system.
How to Set up a Valheim Dedicated Server Manually
Starting a screen Session
1. Get a Game VPS Hosting;
If you’re in a screen session or have the server running in a terminal, press Ctrl + C to carefully stop the server. If it’s running as a service, use:
This section will answer the most common questions about creating Valheim dedicated servers.
If players can’t access your server, consider these troubleshooting tips:
Choosing a suitable game hosting provider is crucial for setting up a dedicated Valheim server. Hostinger stands out as a top game server provider, offering tailored solutions for various gaming needs.
2. Set up Your VPS
sudo apt update && sudo apt upgrade
- Install the software-properties-common package to manage software from sources beyond the official Debian repositories:
Valheim Server Troubleshooting
- Update and upgrade your server’s package index to get the latest features and security patches:
Should you have any questions, don’t hesitate to drop them in the comment box below!
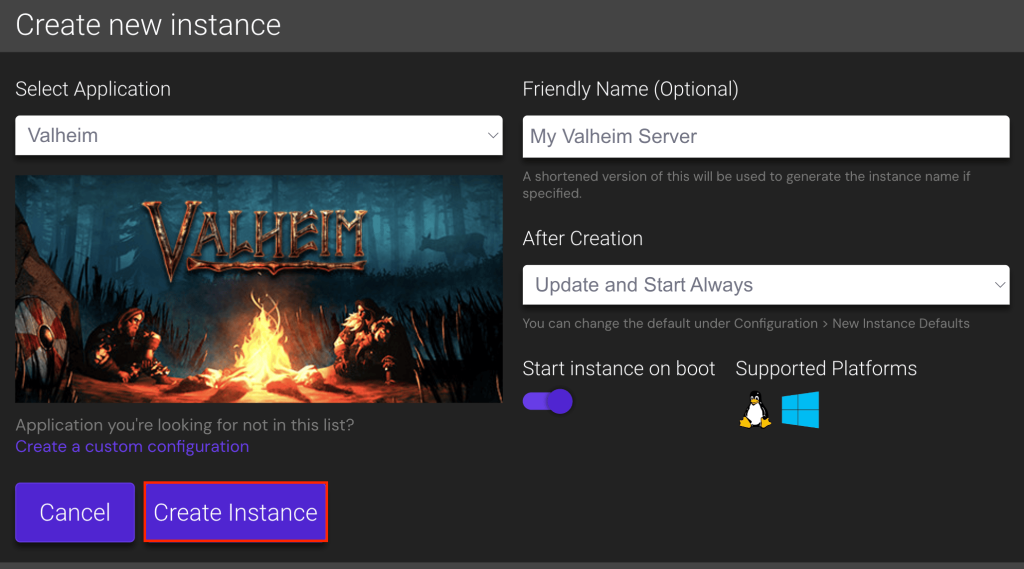
After selecting your desired plan, finish the setup wizard to pick a server location near you and create a secure password for your server. Then, follow these steps to get your Valheim server running with Game Panel:
Safely Stopping the Server
After purchasing a VPS plan, the next step is to prepare it for your Valheim server. For Hostinger customers, firstly, find your VPS login details by heading to the SSH access tab within your VPS dashboard.
- Install SteamCMD with:
If you opt to install the Valheim dedicated server on a Linux VPS, it’s advisable to have a basic understanding of SSH and Linux commands. These skills are helpful for installing, navigating, and managing Linux server systems.
- Switch to the new user account:
sudo apt install steamcmd
- To enhance security, avoid running game servers as the root user. Instead, create a dedicated user for managing the Valheim server:
Valheim is a popular survival game where players explore, build, and survive in a Viking-inspired world. Creating your dedicated server for Valheim offers smoother gameplay, control over who joins your world, and freedom to play as you wish.
- To stop the server, press Ctrl + C.
- Switch back to the root user by running:
Using the latest VPS-based tricks and solutions, our game hosting service grants full root access, allowing you to install, manage, and fine-tune your Valheim server according to your needs. You can also add custom mods to enhance your overall gaming experience.
5. Run Your Valheim Server in the Background
To ensure a stable and enjoyable experience on your Valheim server, you need to maintain and update it regularly. Follow these steps to keep your server in optimal condition:
To invite players, double-click the new instance and look under the Connection info section for the server’s public IP address and default port.
Ariffud is a Technical Content Writer with an educational background in Informatics. He has extensive expertise in Linux and VPS, authoring over 200 articles on server management and web development. Follow him on LinkedIn.
- Install screen if it’s not already installed by running:
Furthermore, Hostinger’s game hosting plans come with dedicated resources and data centers across Asia, Europe, South America, and North America. These ensure low latency and smooth gameplay for players worldwide.
Ariffud Muhammad
- Create a new service file for your Valheim server:
Apr 30, 2024
sudo add-apt-repository multiverse
sudo dpkg –add-architecture i386
sudo apt update
For hosting Valheim, we recommend choosing the Game Panel 4 plan, which comes with a quad-core processor and 16 GB of RAM.
Adopt these best practices to monitor the server’s performance:
If everything is configured correctly, they should be able to join the server and play Valheim without issues.
- The server does not appear in the community server list. Make sure your server is set to public (-public 1) and verify that your firewall settings allow the necessary ports (2456-2458 UDP). The server might also take a while to appear on the list, so please be patient.
- Connection timeouts or failures. Ensure the server’s external IP address is accurate, and that port forwarding is correctly set up on your router. Additionally, confirm that your firewall isn’t blocking incoming connections.
- Game server connection issues. If players can see the server but can’t connect, recheck the server’s IP and port forwarding configurations. Confirm that the server is running and not stuck during startup. Restarting the server might also help fix these issues.
7. Maintain and Update Your Server
To add mods to your Valheim dedicated server, first install a mod manager such as BepInEx. Once installed, place the mod files into the designated plugins folder to enrich your server with new features and gameplay elements.
There are two common methods to maintain your Valheim server running without keeping the terminal open – using the Linux screen and setting up a systemd service.
To back up your Valheim world, execute the following commands, replacing ~/ValheimBackups/worlds with your preferred backup location: