I know it’s a bit tricky, but unlike clip-path, the mask property doesn’t account for the area outside an element to show and hide things. That’s why I was obligated to introduce the extra element — to simulate the “outside” area.
.box {

  --r-top: 10px;

  --r-right: 40px;

  --r-bottom: 30px;

  --r-left: 20px;

  border-radius: var(--r-top) var(--r-right) var(--r-bottom) var(--r-left);

}

.box sh {

  border-radius: calc(150px + var(--r-top)) calc(150px + var(--r-right)) calc(150px + var(--r-bottom)) calc(150px + var(--r-left));

}

.box sh:before {

  border-radius: var(--r-top) var(--r-right) var(--r-bottom) var(--r-left);

}
It’s a question I hear asked quite often: Is it possible to create shadows from gradients instead of solid colors? There is no specific CSS property that does this (believe me, I’ve looked) and any blog post you find about it is basically a lot of CSS tricks to approximate a gradient. We’ll actually cover some of those as we go.
Let’s isolate the <sh> element to understand what is happening there:
Table of Contents
Non-transparent solution
.box {

  --r: 50px;

  border-radius: var(--r);

  border: 2px solid;

}

.box sh {

  position: absolute;

  inset: -152px; /* 150px + 2px */

  border: 150px solid #0000;

  border-radius: calc(150px + var(--r));

}
The last drawback I am aware of is when you’re working with a complex border-radius. For example, if you want a different radius applied to each corner, you must define a variable for each side. It’s not really a drawback, I suppose, but it can make your code a bit tougher to maintain.
Yes, this is yet another post on the topic, but it is different. Together, we’re going to push the limits to get a solution that covers something I haven’t seen anywhere else: transparency. Most of the tricks work if the element has a non-transparent background but what if we have a transparent background? We will explore this case here!
This part was very tedious, and I struggled to find a general solution that doesn’t rely on magic numbers. I ended up with a very complex solution that uses only one pseudo-element, but the code was a lump of spaghetti that covers only a few particular cases. I don’t think it is worth exploring that route.
clip-path: polygon(-100vmax -100vmax,100vmax -100vmax,100vmax 100vmax,-100vmax 100vmax,-100vmax -100vmax,0 0,0 100%,100% 100%,100% 0,0 0)
I‘d say this is a more suitable way to go because the spread distance will be more accurate, as it starts from the border-box instead of the padding-box. But you will need to adjust the inset value according to the main element’s border. Sometimes, the border of the element is unknown and you have to use the previous solution.
Another useful thing we get from using an extra element is that the element is fixed, and only the pseudo-element is moving (using translate). This will allow me to easily define the mask, which is the last step of this trick.
We will introduce the mask property to the mix.
.box {

  --s: 10px; /* the spread  */

  position: relative;

}

.box::before {

  inset: calc(-1 * var(--s));

  clip-path: polygon(

    -100vmax -100vmax,

     100vmax -100vmax,

     100vmax 100vmax,

    -100vmax 100vmax,

    -100vmax -100vmax,

    calc(0px  + var(--s)) calc(0px  + var(--s)),

    calc(0px  + var(--s)) calc(100% - var(--s)),

    calc(100% - var(--s)) calc(100% - var(--s)),

    calc(100% - var(--s)) calc(0px  + var(--s)),

    calc(0px  + var(--s)) calc(0px  + var(--s))

  );

}
If you try adding border-radius to the element when using the non-transparent solution we started with, it is a fairly trivial task. All you need to do is to inherit the same value from the main element, and you are done.
I applied a transform to the main element, and boom! The shadow is no longer below the element. This is not a bug but the logical result of a stacking context. Don’t worry, I will not start a boring explanation about stacking context (I already did that in a Stack Overflow thread), but I’ll still show you how to work around it.
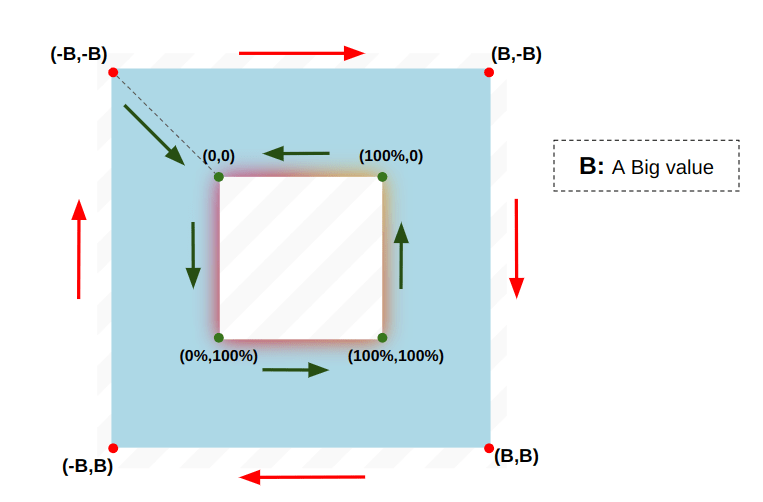
Indeed, there’s no way to do that, but we can simulate it using a particular polygon pattern:
Now all we have to do is to update a few variables to control the gradient shadow. And while we are at it, let’s also make the blur radius a variable as well:
The first step is to position the <sh> element and purposely create an overflow:
Transparent solution
box-shadow: 10px 8px 10px 5px orange;
If you look closely you will notice that both shadows are a little different, especially the blur part. It’s not a surprise because I am pretty sure the filter property’s algorithm works differently than the one for box-shadow. That’s not a big deal since the result is, in the end, quite similar.
Also, note that I am using a combination of border and inset to define that area. This allows me to keep the padding-box of that extra element the same as the main element so that the pseudo-element won’t need additional calculations.
Here’s a demo showing the gradient shadow next to a classic box-shadow:
We’ve reached the end! The magic behind gradient shadows is no longer a mystery. I tried to cover all the possibilities and any possible issues you might face. If I missed something or you discover any issue, please feel free to report it in the comment section, and I’ll check it out.
Note how the inner radius matches the main element’s border-radius. I have defined a big border (150px) and a border-radius equal to the big border plus the main element’s radius. On the outside, I have a radius equal to 150px + R. On the inside, I have 150px + R - 150px = R.
.box {

  position: relative;

  transform-style: preserve-3d;

}

.box::before {

  content: "";

  position: absolute;

  inset: -5px;

  transform: translate3d(10px, 8px, -1px); /* (X, Y, Z) */

  background: /* .. */;

  filter: blur(10px);

}
.box sh {

  position: absolute;

  inset: -150px;

  border: 150px solid red;

  background: lightblue;

  border-radius: calc(150px + var(--r));

}
As I said, this solution is probably good enough in a majority of cases where you want a gradient shadow, as long as you don’t need to support transparency. But we are here for the challenge and to push the limits, so even if you don’t need what is coming next, stay with me. You will probably learn new CSS tricks that you can use elsewhere.
As far as I know, there is no side effect to this solution… but maybe you see one. If that’s the case, share it in the comment section, and let’s try to find a fix for it!
It’s a different story when dealing with the transparent solution. Unfortunately, it means finding another solution because clip-path cannot deal with curvatures. That means we won’t be able to cut the area inside the main element.
.box {

  --r: 50px;

  position: relative;

  border-radius: var(--r);

}

.box sh {

  position: absolute;

  inset: -150px;

  border: 150px solid #0000;

  border-radius: calc(150px + var(--r));

}
Are there any drawbacks to this method?
.box {

  position: relative;

}

.box::before {

  content: "";

  position: absolute;

  inset: -5px; /* control the spread */

  transform: translate(10px, 8px); /* control the offsets */

  z-index: -1; /* place the element behind */

  background: /* your gradient here */;

  filter: blur(10px); /* control the blur */

}
There’s still one more thing left for us to do, and it’s to account for the spread distance and the offsets. The only reason the demo above works is because it is a particular case where the offsets and spread distance are equal to
0.And, of course, you have the online generator you can reach for anytime you want to avoid the hassle.
Let’s start with the solution that’ll work for 80% of most cases. The most typical case: you are using an element with a background, and you need to add a gradient shadow to it. No transparency issues to consider there.
We must hide the inner (blue) part and make sure the border (red) part is still visible. To do that, I’ve defined two mask layers —One that covers only the content-box area and another that covers the border-box area (the default value). Then I excluded one from another to reveal the border.
Adding a border radius
Before we start, let me introduce my gradient shadows generator. All you have to do is to adjust the configuration, and get the code. But follow along because I’m going to help you understand all the logic behind the generated code.
The arrows illustrate the path that defines the polygon. We start from
(-B, -B)until we reach(0,0). In total, we need 10 points. Not eight points because two points are repeated twice in the path ((-B,-B)and(0,0)).I decided to insert an extra element for the sake of simpler code. Here’s the markup:
It’s the same logic with the offsets. When we translate the pseudo-element, the shadow is out of alignment, and we need to rectify the polygon again and move the points in the opposite direction.
.box {

  --r: 50px;

  position: relative;

  border-radius: var(--r);

  transform-style: preserve-3d;

}

.box sh {

  position: absolute;

  inset: -150px;

  border: 150px solid #0000;

  border-radius: calc(150px + var(--r));

  transform: translateZ(-1px)

}

.box sh::before {

  content: "";

  position: absolute;

  inset: -5px;

  border-radius: var(--r);

  background: /* Your gradient */;

  filter: blur(10px);

  transform: translate(10px,8px);

}
With the earlier non-transparent solution, it’s possible you will face a stacking context issue. And with the transparent solution, it’s possible you face a border issue instead. Now you have options and ways to work around those issues. The 3D transform trick is my favorite solution because it fixes all the issues (The online generator will consider it as well)
The pseudo-element is now bigger than the main element, so the
clip-pathcuts more than we need it to. Remember, we always need to cut the part inside the main element (the area inside the green border of the example). We need to adjust the position of the four points inside ofclip-path.If for some reason you are unable to use a 3D
transform, the other solution is to rely on two pseudo-elements —::beforeand::after. One creates the gradient shadow, and the other reproduces the main background (and other styles you might need). That way, we can easily control the stacking order of both pseudo-elements.
.box {

  position: relative;

  z-index: 0; /* We force a stacking context */

}

/* Creates the shadow */

.box::before {

  content: "";

  position: absolute;

  z-index: -2;

  inset: -5px;

  transform: translate(10px, 8px);

  background: /* .. */;

  filter: blur(10px);

}

/* Reproduces the main element styles */

.box::after {

  content: """;

  position: absolute;

  z-index: -1;

  inset: 0;

  /* Inherit all the decorations defined on the main element */

  background: inherit;

  border: inherit;

  box-shadow: inherit;

}
This solution is good, but still has a few drawbacks related to the
z-index: -1declaration. Yes, there is “stacking context” happening there!The idea is to find a way to cut or hide everything inside the area of the element (inside the green border) while keeping what is outside. We are going to use clip-path for that. But you might wonder how
clip-pathcan make a cut inside an element.It all depends on the border. Don’t forget that the reference for a pseudo-element is the padding box, so if you apply a border to your main element, you will have an overlap. You either keep the 3D
transformtrick or update theinsetvalue to account for the border.
<div class="box">

  <sh></sh>

</div>
Even if you don’t have a border radius, it’s a good idea to define
border-radius: inherit. That accounts for any potentialborder-radiusyou might want to add later or a border radius that comes from somewhere else.
mask:

  linear-gradient(#000 0 0) content-box,

  linear-gradient(#000 0 0);

mask-composite: exclude;
Yes, this definitely not perfect. The first issue you may face is related to using a border on the main element. This may create a small misalignment in the radii if you don’t account for it. We have this issue in our example, but perhaps you can hardly notice it.
Let’s define the spread and see what happens. Remember that we use
insetwith a negative value to do this:Let’s pick up where we left off on the 3D
transformand remove the background from the main element. I will start with a shadow that has both offsets and spread distance equal to0.The blue area is the visible part after applying the
clip-path. I am only using the blue color to illustrate the concept, but in reality, we will only see the shadow inside that area. As you can see, we have four points defined with a big value (B). My big value is100vmax, but it can be any big value you want. The idea is to ensure we have enough space for the shadow. We also have four points that are the corners of the pseudo-element.Do we still need the 3D
transformtrick?But first… another article about gradient shadows? Really?
Again, a lot of this is likely overkill considering that the de facto solution will cover most of your use cases. Nevertheless, it’s good to know the “why” and “how” behind the trick, and how to overcome its limitations. Plus, we got good exercise playing with CSS clipping and masking.
The first solution that I recommend is to use a 3D
transform:Note that the area of the
<sh>element is defined with the black outline. Why I am doing this? Because that way, I am able to apply amaskon it to hide the part inside the green area and keep the overflowing part where we need to see the shadow.The solution is to rely on a pseudo-element where the gradient is defined. You place it behind the actual element and apply a blur filter to it.
The fix is relatively easy: Add the border’s width for the
<sh>element’sinset.Wrapping up
Here is the previous demo with an updated
insetvalue in place of the 3Dtransform:
.box {

  --s: 10px; /* the spread */

  --x: 10px; /* X offset */

  --y: 8px;  /* Y offset */

  position: relative;

}

.box::before {

  inset: calc(-1 * var(--s));

  transform: translate3d(var(--x), var(--y), -1px);

  clip-path: polygon(

    -100vmax -100vmax,

     100vmax -100vmax,

     100vmax 100vmax,

    -100vmax 100vmax,

    -100vmax -100vmax,

    calc(0px  + var(--s) - var(--x)) calc(0px  + var(--s) - var(--y)),

    calc(0px  + var(--s) - var(--x)) calc(100% - var(--s) - var(--y)),

    calc(100% - var(--s) - var(--x)) calc(100% - var(--s) - var(--y)),

    calc(100% - var(--s) - var(--x)) calc(0px  + var(--s) - var(--y)),

    calc(0px  + var(--s) - var(--x)) calc(0px  + var(--s) - var(--y))

  );

}
mask:

  linear-gradient(#000 0 0) content-box,

  linear-gradient(#000 0 0);

mask-composite: exclude;
It’s done! We have our gradient shadow, and it supports
border-radius! You probably expected a complexmaskvalue with oodles of gradients, but no! We only need two simple gradients and amask-compositeto complete the magic.