Jul 11, 2025
Ariffud M.
Running n8n with Docker is an efficient way to self-host this workflow automation tool. Unlike installing n8n directly on your virtual private server (VPS), Docker offers a containerized environment that isolates n8n from your main system.
This makes it easy to upgrade or downgrade your n8n versions, scale your setup to accommodate more workflows, and even migrate your n8n instance to another server.
In this article, you’ll learn how to run n8n using Docker and Docker Compose. This method lets you define the n8n service, environment variables, and dependencies – such as a database – in a single YAML file.
Keep reading for step-by-step instructions for installing, configuring, securing, and updating your n8n instance using Docker.
How to self-host n8n with Docker
To self-host n8n with Docker, you’ll need to start by installing Docker and Docker Compose on your VPS. Next, you’ll need to create a Docker Compose file to configure your n8n service. Finally, you’ll have to run the n8n container using the docker compose up -d command.
Then, you can secure your n8n setup with SSL and a reverse proxy, modify environment variables as needed, and update n8n whenever new versions are released.
The following sections explain each step in more detail.
📚 Suggested reading
If you prefer to install n8n directly on your VPS, don’t worry. We have a dedicated tutorial to guide you through the process.
1. Install Docker and Docker Compose
First, make sure Docker is set up on your server. Starting with Docker v20.10.0, Docker Compose is included by default as a plugin, so you don’t need to install it separately.
If you use Hostinger’s Docker VPS hosting, you’re in luck – Docker comes preinstalled, so you can skip this step entirely.
Users with regular Hostinger VPS plans can still install Docker either via a preconfigured template or manually through the command line.
If you choose the latter, verify the installation by running the following Linux command in your terminal:
docker -v
This will display the installed Docker version, like this:

Download free docker cheat sheet
2. Prepare the n8n data directory
Next, create directories to store n8n’s data and configuration files. Run the command below to create the main directory for n8n and navigate to it:
mkdir ~/n8n && cd ~/n8n
Inside the newly created directory, create a subdirectory called n8n_data to store n8n’s persistent data:
mkdir n8n_data
Set the correct ownership for the persistent data, which is important when running n8n with Docker:
sudo chown -R 1000:1000 n8n_data

3. Create a Docker Compose file for n8n
After preparing directories for n8n, create a new Docker Compose file to configure n8n’s settings, define environment variables, and specify the necessary volumes.
You can do so by using the nano text editor:
sudo nano docker-compose.yml
Paste the following content, replacing yourUser and yourPassword with your preferred credentials:
services:

  n8n:

    image: n8nio/n8n

    ports:

      - "5678:5678"

    environment:

      - N8N_BASIC_AUTH_ACTIVE=true

      - N8N_BASIC_AUTH_USER=yourUser

      - N8N_BASIC_AUTH_PASSWORD=yourPassword

    volumes:

      - ./n8n_data:/home/node/.n8n
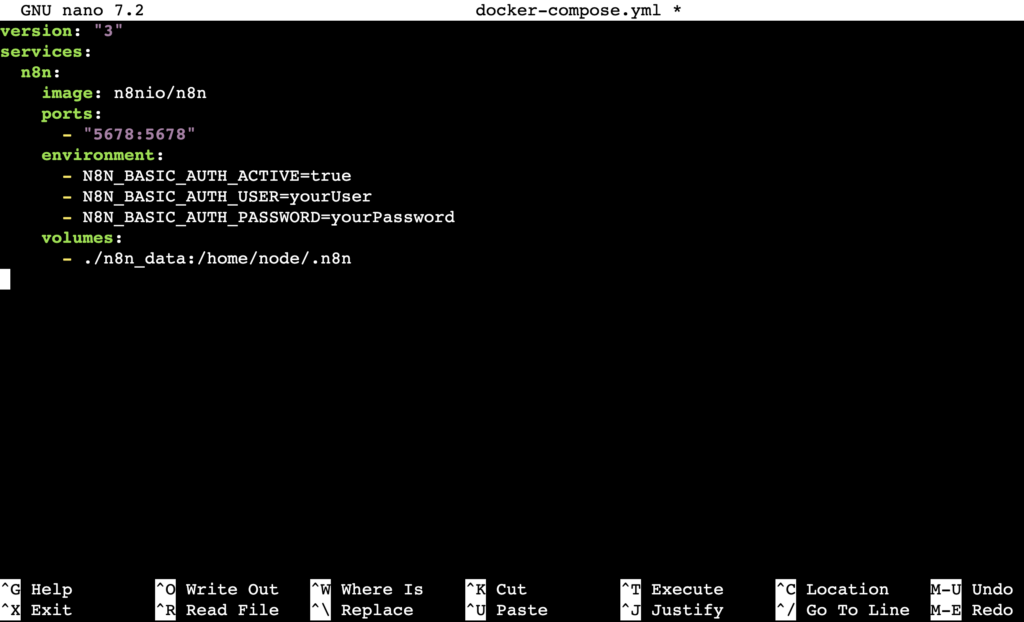
Once done, save your changes and exit nano by pressing Ctrl + X → Y → Enter.
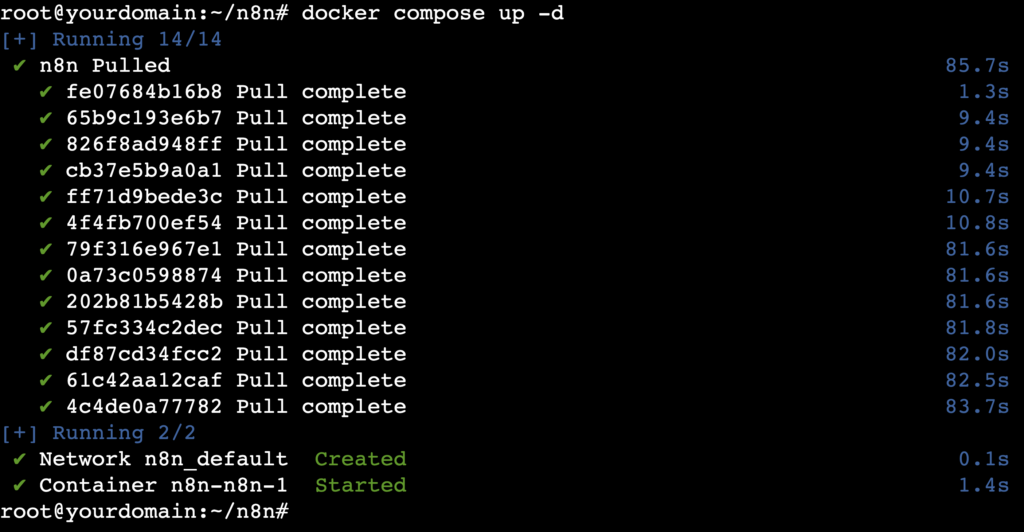
4. Start the n8n container
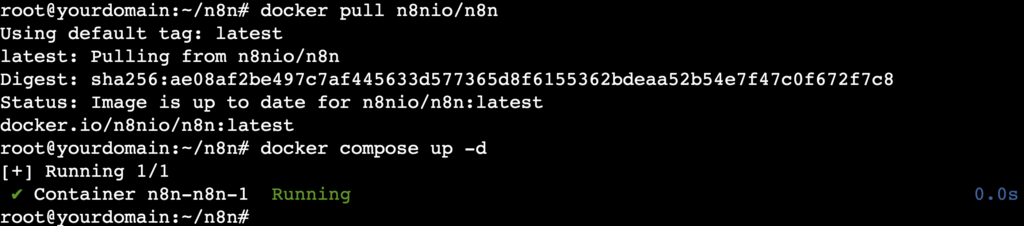
Now, run the n8n container with this command:
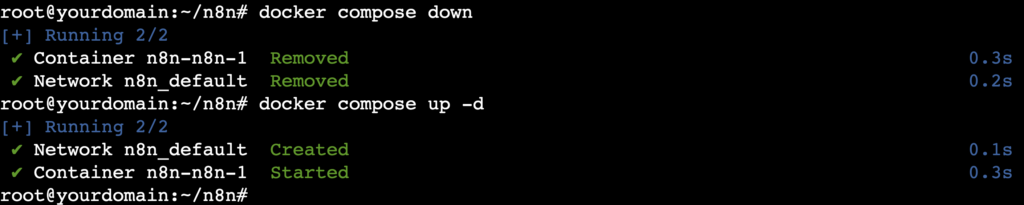
docker compose up -d
You’ll see the container starting process. Once complete, it will display lines like Created and Started, similar to the image below:
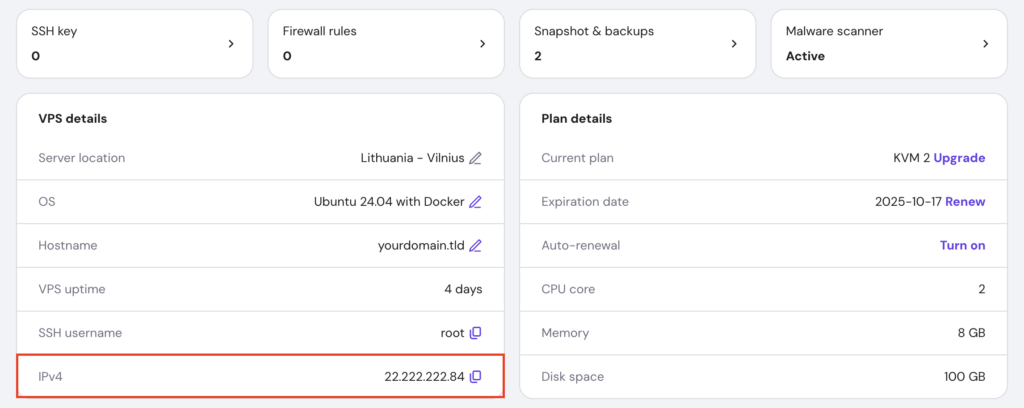
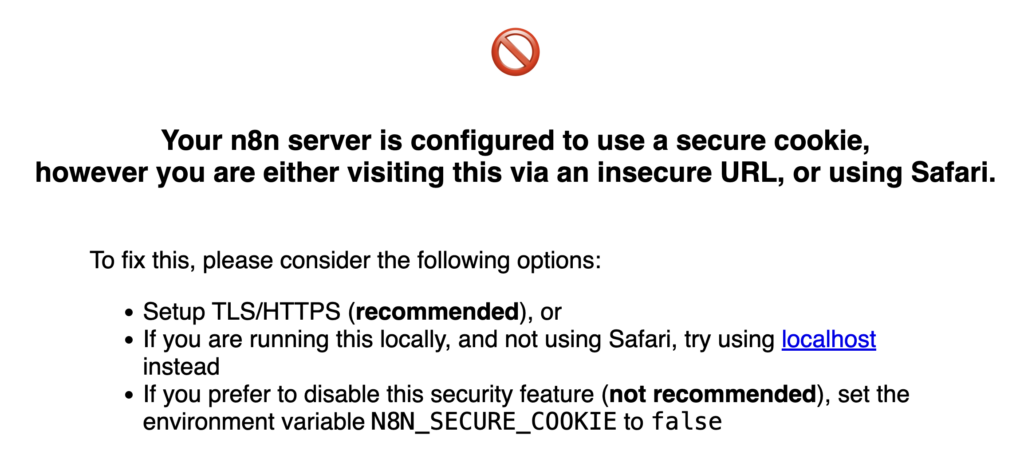
To verify if your n8n container has started, open the following address in your browser, replacing your_vps_ip with your own VPS’ IP address:
http://your_vps_ip:5678
Hostinger VPS customers can find their server’s IP in hPanel by going to VPS → Manage → Overview → VPS details.
If you see a secure cookie error warning like in the image below when visiting the address, don’t worry. Your n8n instance is actually running. The error occurs because SSL is not set up for secure connections, but you’ll address this in the next step.
5. Secure n8n with SSL and an NGINX reverse proxy
To securely access your n8n instance via HTTPS, you’ll need to issue an SSL certificate and configure a reverse proxy.
First, install the NGINX web server on your VPS:
sudo apt install nginx -y
Immediately stop the NGINX service temporarily:
sudo systemctl stop nginx
Next, install Certbot to obtain your SSL certificate:
sudo apt install certbot -y
Get a standalone SSL certificate version of Certbot. Replace yourdomain.tld with your actual domain name if you’ve pointed it to your VPS. Otherwise, issue an SSL certificate for your hostname:
sudo certbot certonly --standalone -d yourdomain.tld
You’ll be prompted to enter a valid email address, accept the terms of service, and optionally sign up to receive promotional emails.
Once done, start NGINX again:
sudo systemctl start nginx
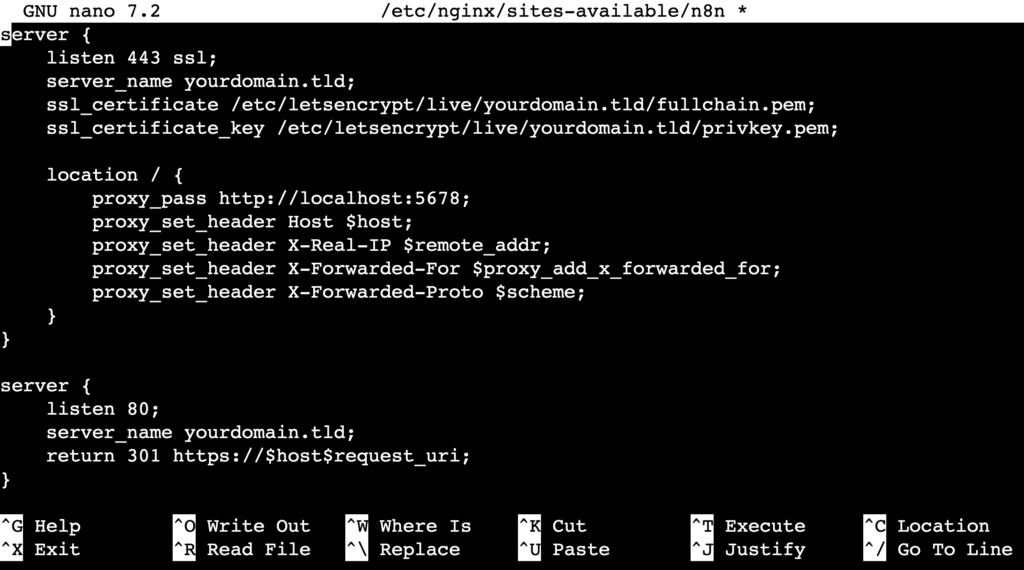
After that, create a configuration file to set up the reverse proxy with NGINX:
sudo nano /etc/nginx/sites-available/n8n
Inside the file, paste the configuration details below. Replace yourdomain.tld with your own domain or hostname.
server {

    listen 443 ssl;

    server_name yourdomain.tld;

    ssl_certificate /etc/letsencrypt/live/yourdomain.tld/fullchain.pem;

    ssl_certificate_key /etc/letsencrypt/live/yourdomain.tld/privkey.pem;

    location / {

        proxy_pass http://localhost:5678;

        proxy_set_header Host $host;

        proxy_set_header X-Real-IP $remote_addr;

        proxy_set_header X-Forwarded-For $proxy_add_x_forwarded_for;

        proxy_set_header X-Forwarded-Proto $scheme;

    }

}

server {

    listen 80;

    server_name yourdomain.tld;

    return 301 https://$host$request_uri;

}
After saving the file and quitting the editor, run this command to enable the configuration:
sudo ln -sf /etc/nginx/sites-available/n8n /etc/nginx/sites-enabled/n8n
Test the NGINX configuration for errors:
sudo nginx -t
Reload the NGINX service to apply the changes:
sudo systemctl reload nginx
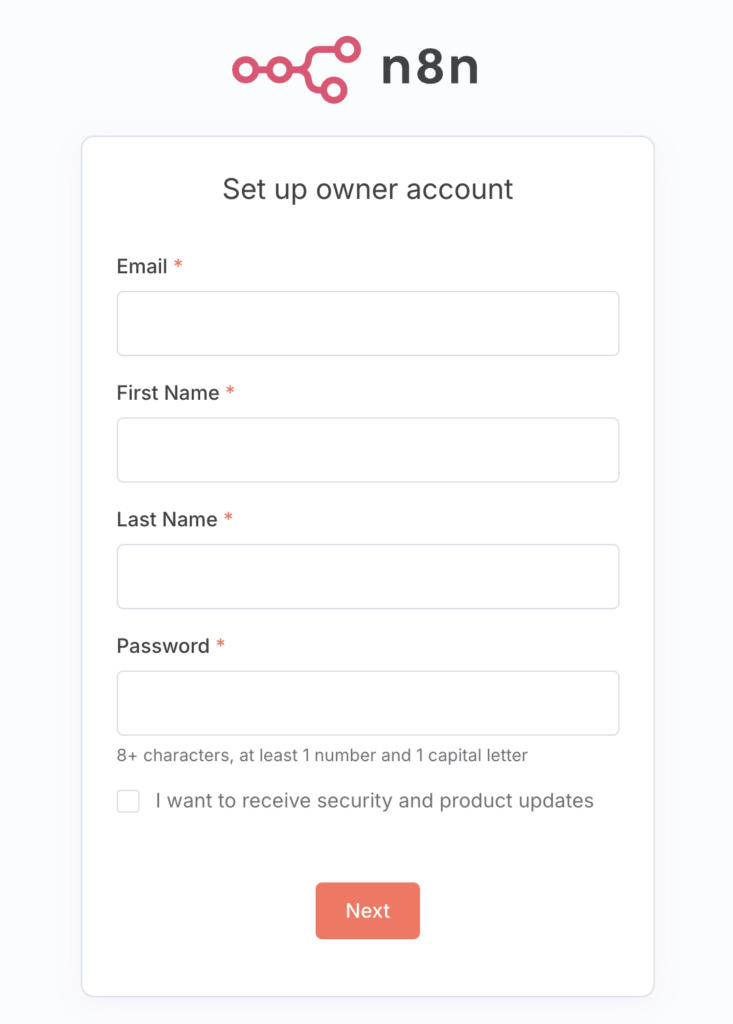
6. Access your n8n instance
Now, visit your n8n instance using the domain or hostname you previously configured. You’ll see the n8n owner account registration page, where you can sign up with your preferred credentials.
After that, open the n8n dashboard to start creating automation workflows. You can check out some n8n workflow examples for inspiration.
If you don’t want to start from scratch, find n8n templates for ready-made solutions.
Don’t forget to explore n8n integrations to see what you can connect, which tools to use, and the use cases for each integration.
7. Modify n8n environment variables
When managing your n8n instance, you may need to modify environment variables to set up database connections, enable authentication, integrate third-party services, or enhance security.
To do this, return to your terminal and edit your Docker Compose file:
sudo nano docker-compose.yml
Under the environment section, add or modify configuration settings for your n8n container. Here are some of the most commonly used variables:
- N8N_ENCRYPTION_KEY – encrypts credentials in the database for added security.
- N8N_ENCRYPTION_KEY=yourStrongRandomString
- N8N_HOST, N8N_PORT, N8N_PROTOCOL – ensures n8n generates correct URLs, especially behind a reverse proxy or when using SSL.
- N8N_HOST=yourdomain.tld

- N8N_PORT=5678

- N8N_PROTOCOL=https
- WEBHOOK_URL – sets the public URL for webhooks, which is important if you use HTTPS or a custom domain.
- WEBHOOK_URL=https://youdomain.tld
- DB_TYPE, DB_POSTGRESDB – lets you use PostgreSQL instead of the default SQLite for better performance and scalability.
- DB_TYPE=postgresdb

- DB_POSTGRESDB_HOST=your_postgres_host

- DB_POSTGRESDB_PORT=5432

- DB_POSTGRESDB_DATABASE=your_database_name

- DB_POSTGRESDB_USER=your_db_user

- DB_POSTGRESDB_PASSWORD=your_db_password
- TZ – sets the timezone for n8n.
- TZ=UTC
Save the file once you’ve made the necessary changes.
Next, run the following Docker command to stop the n8n container:
docker compose down
Bring the container back up with the updated environment variables:
docker compose up -d
💡 Pro tip
If you just want to restart your n8n Docker container without modifying the Compose file, use the docker compose restart command instead.
8. Update n8n to the latest version
You should periodically update n8n to the latest version to minimize security risks and take advantage of new features and improvements.
To update, first pull the latest n8n image from Docker Hub:
docker pull n8nio/n8n
Then, restart the n8n container with the updated image:
docker compose up -d
What are the best practices for managing n8n with Docker?
Here are some best practices for managing n8n with Docker, including some already demonstrated in this tutorial:
- Mount Docker volumes. Mount a host directory like ./n8n_data:/home/node/.n8n to persist workflows, credentials, and execution data outside the container. This ensures your data survives updates, restarts, or container recreation.
- Configure environment variables. In docker-compose.yml, set API keys, webhook secrets, database credentials, and other sensitive data as environment variables. This keeps secrets out of workflows and source code, improving security and simplifying key rotation.
- Secure access. Always enable basic authentication (N8N_BASIC_AUTH_ACTIVE=true) and use strong usernames and passwords. For secure communication, place n8n behind a reverse proxy like NGINX with SSL so that all data, including credentials, is encrypted and not sent in plain text.
- Perform regular backups. Periodically back up the host folder mapped to /home/node/.n8n, not the container’s internal path. For a running container, use the command below:
docker cp n8n:/home/node/.n8n /path/to/backup/folder
- Set resource limits. In your docker-compose.yml file, set CPU and memory limits to prevent n8n from overusing your VPS resources. For example:
deploy:
  resources:
    limits:
      cpus: '1'
      memory: 1G
- Monitor logs and performance. Run docker compose logs n8n to review logs and troubleshoot issues. For ongoing monitoring, consider integrating with a system like the LGTM stack to receive alerts if n8n is down or misbehaving.
Why is Hostinger the best way to host your n8n Docker setup?
Docker makes self-hosting n8n easy and flexible by providing a portable, consistent environment across systems. But to keep it running reliably 24/7, you can’t rely on your personal machine – you need a VPS.
A VPS runs continuously, so your workflows stay active even when your computer is off or disconnected. It also lets you access and manage n8n securely from anywhere, not just your local network.
Hostinger’s Docker VPS is an excellent choice for self-hosting containerized apps like n8n. Docker and all required components come preinstalled, so you can deploy n8n quickly without extra setup.
We offer multiple data centers across regions, so you can choose a server closer to you for minimal latency. Plus, with Hostinger’s 99.9% uptime guarantee, your automation workflows stay online reliably around the clock.
Starting from $4.49/month, our Docker VPS plans include up to 8 vCPU cores, 32 GB of RAM, and 400 GB of NVMe storage. You can start small and upgrade to a higher plan in just a few clicks as your automation needs grow.
Security is a priority, with automatic backups, advanced DDoS protection, and a malware scanner to keep your data safe, block attacks, and prevent disruptions to your n8n setup.
What’s next after self-hosting n8n with Docker?
Self-hosting n8n with Docker gives you full control, flexibility, and scalability for your workflow automation. It lets you run a powerful automation tool on your own terms – securely, reliably, and with room to grow.
As you continue building and managing your n8n setup, here’s what you can do next:
If you still have any questions about running and managing n8n with Docker, feel free to leave a comment below.
All of the tutorial content on this website is subject to
Hostinger’s rigorous editorial standards and values.

Ariffud is a Technical Content Writer with an educational background in Informatics. He has extensive expertise in Linux and VPS, authoring over 200 articles on server management and web development. Follow him on LinkedIn.