Just installed pfSense? Before diving into VLANs, firewall rules, or VPN tunnels, take a few minutes to lock in these essential setup changes. These quick tweaks will boost security, improve reliability, and prevent many future headaches. This is my post-install checklist for pfSense deployment.
In This Article
1 — Bump the local backup count well past the default
2 — Turn on encrypted Auto Config Backup for cloud backups
3 — Switch the DHCP backend to Kea early on
4 — Turn on hardware crypto and choose the right thermal sensor
5 — Move /tmp and /var into RAM for speed on beefy boxes
6 — Install Service Watchdog to auto-restart key daemons
System → Package Manager → Available Packages → Service_Watchdog
Suricata, pfBlockerNG, Wireguard, and OpenVPN are all great, until one of them crashes at 3 a.m. Unbound stopped on my pfSense yesterday after I restarted Suricata and pfBlockerNG. The Watchdog package polls selected services every minute and restarts any that aren’t running. A tiny safety net that costs almost no resources but saves a midnight drive home (or office) to the rack.
7 — Harden the WebGUI even more
Note: By default, pfSense isn’t reachable outside of your LAN. However, it’s still a good practice to make this change, in the event that pfSense gets unknowingly exposed someday.

Straight after the installation, head to System → Advanced → Admin Access. Switch the webConfigurator to HTTPS and, in the TCP port box, use a non-standard port anything high and random works.
That single change does two things: it encrypts every login session and keeps casual scanners from spotting your firewall on the popular default port 443.
8 — Leave SSH turned off (or harden it, if enabled)

Still on System → Advanced → Admin Access, scroll down to Secure Shell.
If you have a good reason to check Enable Secure Shell, set SSHD Key Only to Require both Password and Public Key, and choose a non-standard port instead of the default port 22. That gives you an encrypted back-door for maintenance while sheltering the daemon from the endless credential-stuffing noise that targets port 22. Ideally, keep SSH disabled!
9 — Tighten Login Protection
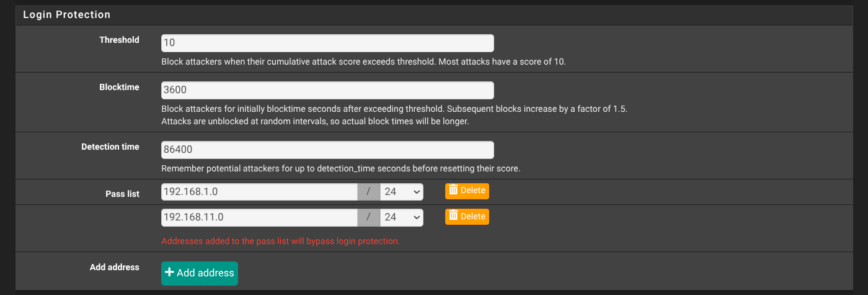
Yet again, on the System → Advanced → Admin Access page, scroll to Login Protection and harden the values. Shown in the screenshot above are my recommended settings: threshold 10, block-time 3600 seconds, detection window 86400 seconds, with at least your internal subnets in the pass-list. These settings lock out an IP for an hour after a bad login attempt, while letting trusted LAN ranges bypass the check.
Of course, like my setup, your pfSense won’t be available via any public ports by default. However, it’s still a best practice to have these settings in place, in the event that pfSense gets unknowingly exposed.
10 — Disable the built-in “admin” user and create your own

Under System → User Manager → Users, click Add to create a new account with a non-obvious username, a strong password, membership in the admins group, and no shell access.

Next, edit the default admin user, tick This user cannot login, and save. From now on, you’ll manage the firewall through that new user only. If you ever need console work, briefly re-enable the original admin account, finish your task, and disable it again. With that, you’re now ready to dive into pfSense configuration!
11 — Check for pfSense updates
12 — Install extra packages for security, automation, and monitoring
Conclusion
Once you’ve locked in these setup changes, you’re ready to dive deeper into your firewall configuration. Check out my pfSense Firewall 2.8: Install, Setup & Config Walkthrough I update it regularly with screenshots and real-world notes from my deployments.